As an administrator, you can manage how users in your organization can create and use shared drives to collaborate in Google Drive. Files in shared drives are owned by your organization, rather than an individual, so they persist even if the file owner leaves your organization, helping you avoid potential data loss.
Encourage your users to use shared drives for content intended for organization-wide or team use, such as project plans, research results, or team meeting notes. Have your users keep personal and private files, such as one-on-one meeting notes, performance assessments, and career development plans, in My Drive.
Supported editions for this feature: Business Standard and Business Plus; Enterprise; Education Fundamentals, Education Standard, Teaching and Learning Upgrade, and Education Plus; Nonprofits; G Suite Business; Essentials. Compare your edition
On this page
Allow users to create shared drives
Change the access level of a shared drive member
Set the default sharing settings for shared drives
Restrict who can move content to external shared drives
Review user activity in shared drives
Review and appeal disabled shared drives
Move your organization's content to shared drives
Move folders into shared drives as an admin
Allow file owners or editors to move files into shared drives
Allow a user to move most files and folders to shared drives
Manage data policies for specific shared drives
Assign a shared drive to an organizational unit
Set the default organizational unit for new shared drives
Delete or restore a shared drive and its files for your users
Allow users to create shared drives
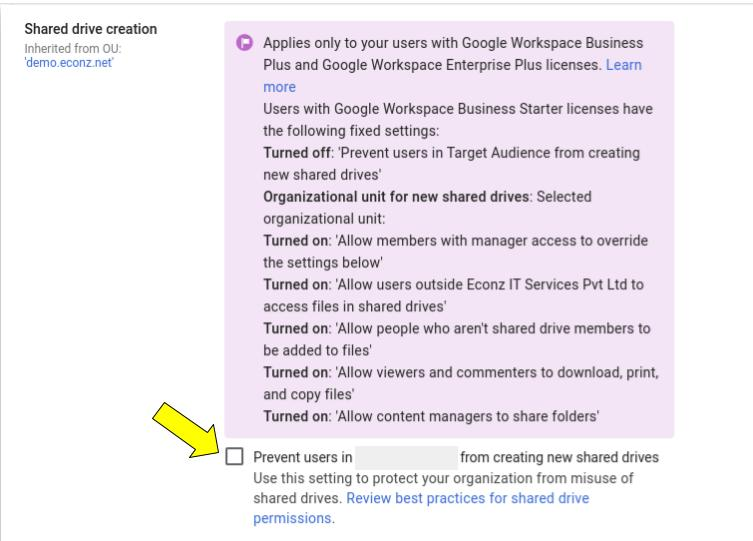
As an administrator, you can let all or some users in your organization create shared drives. For example, if you're a business you might want to let everyone create shared drives to support team collaboration and prevent data loss when an employee leaves. However, if you're an educational institution, you might only allow instructors to create shared drives, not students.
Note: If shared drive creation is turned off for users in an organizational unit, people inside and outside of your company or school can still add these users to their shared drives.
Before you begin: To apply the setting for certain users, put their accounts in an organizational unit.
-
In the Admin console, go to Menu > Apps > Google Workspace > Drive and Docs.
-
Click Sharing settings.

-
Click Shared Creation.
-
To apply the setting to everyone, leave the top organizational unit selected. Otherwise, select a child organizational unit.
-
Locate the Prevent users in selected-organizational-unit from creating new shared drives box and choose an option:
-
To allow users to create shared drives, uncheck the box.
-
To prevent users from creating shared drives, check the box.
-
-
(Optional) If you allow users to create shared drives, choose which organizational unit the shared drives are created in by default. You can move shared drives to other organizational units later. This option can help you monitor and manage storage for your organization.
-
(Optional) Set the default sharing settings for new shared drives, and choose whether shared drive managers can override those settings.
-
To prevent external users from accessing files in shared drives, uncheck the second box. External users won't have access, even if you allow users to share files outside of your organization. This setting also blocks shared drive managers from adding external users as members. If users aren’t allowed to share any items in Drive outside of your organization, this setting has no effect because it can’t override the sharing setting.
-
To prevent shared drive members from giving non-members view, comment, or edit access to files in shared drives, or sharing these files with a link, uncheck the third box. You might do this for organizational units that handle sensitive data that shouldn’t be shared outside that organizational unit.
-
To prevent Content managers from sharing folders, uncheck Allow content managers to share folders. You might do this if you only want Managers to be able to share folders.
-
To prevent shared drive members who have a viewer or commenter access from downloading, copying, or printing files in shared drives, uncheck the fourth box. You might do this for organizational units that work with confidential data or projects.
Note: Files and folders in shared drives retain this setting when they're moved out of shared drives. In the case of folders, the setting can't be reverted after the file is in My Drive.
-
To prevent shared drive members with manager access from changing these default settings, uncheck the first box. In most cases, you might want to allow shared drive managers to change the access settings for a shared drive so that they aren’t prevented from collaborating with external users or other teams.
-

Note: If you change these settings later, only new shared drives are affected. Existing shared drives keep their current settings. You can update sharing settings for existing shared drives in the admin console.
-
Click Save. If you configured a child organizational unit, you might be able to Inherit or Override a parent organizational unit's settings.
Changes can take up to 24 hours but typically happen more quickly.
Change the access level of a shared drive member
As an administrator, you can change the access level for a member of a shared drive, even if you’re not a manager of the shared drive. For example, if you’re concerned about a specific user having Manager access to a shared drive, you can reduce their access level.
-
In the Admin console, go to Menu > Apps > Google Workspace > Drive and Docs.
-
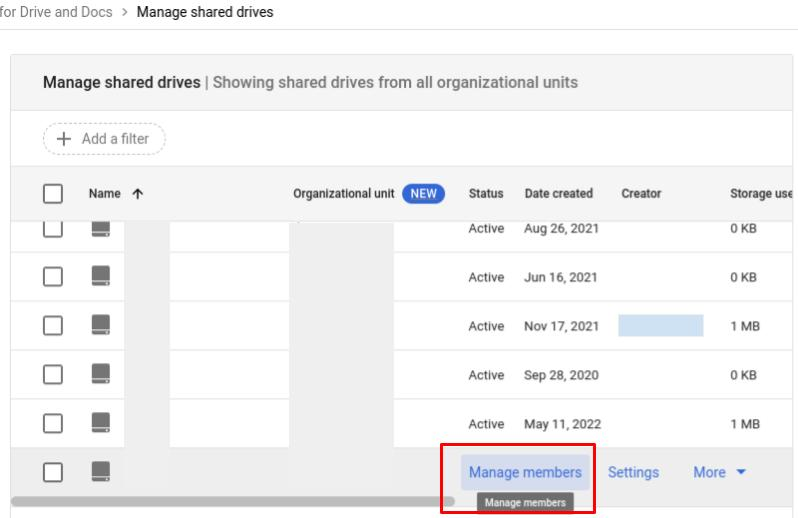
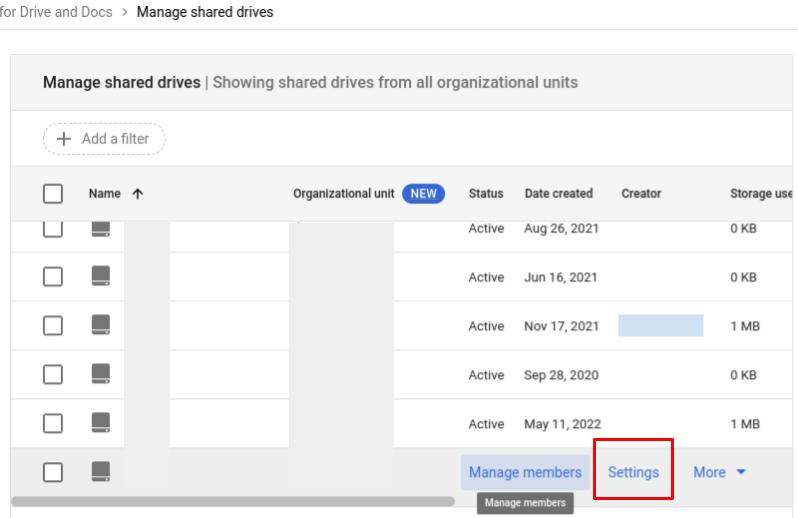
Click Manage shared drives.
-
Point to the shared drive with the member you want to update and click Manage members. If you have many shared drives, you can filter the list by shared drive name or other attributes.
-
In the row for the member you want to update, click their current access level, then click the new access level.
-
Click Done.

Set the default sharing settings for shared drives
As an administrator, you can set the default sharing settings for shared drives by the organizational unit they’re assigned to. You can also prevent members with Manager access from changing those settings. For example, if you don't want users in an organizational unit to share content outside your organization, you can block external sharing and prevent managers from changing that setting.
Important: The default sharing settings apply only to new shared drives. If you have existing shared drives that you want to change sharing settings for, go to the next section.
Before you begin: To apply the setting for certain users, put their accounts in an organizational unit.
-
In the Admin console, go to Menu > Apps > Google Workspace > Drive and Docs.
-
Select Sharing settings.
-
To apply the setting to everyone, leave the top organizational unit selected. Otherwise, select a child organizational unit.
-
Set the default sharing settings for new shared drives, and choose whether shared drive managers can override those settings.
-
To prevent external users from accessing files in shared drives, uncheck the second box. External users won't have access, even if you allow users to share files outside of your organization. This setting also blocks shared drive managers from adding external users as members. If users aren’t allowed to share any items in Drive outside of your organization, this setting has no effect because it can’t override the sharing setting.
-
To prevent shared drive members from giving non-members view, comment, or edit access to files in shared drives, or sharing these files with a link, uncheck the third box. You might do this for organizational units that handle sensitive data that shouldn’t be shared outside that organizational unit.
-
To prevent Content managers from sharing folders, uncheck Allow content managers to share folders. You might do this if you only want Managers to be able to share folders.
- To prevent shared drive members who have a viewer or commenter access from downloading, copying, or printing files in shared drives, uncheck the fourth box. You might do this for organizational units that work with confidential data or projects.
-
Note: Files and folders in shared drives retain this setting when they're moved out of shared drives. In the case of folders, the setting can't be reverted after the file is in My Drive.
-
- To prevent shared drive members with manager access from changing these default settings, uncheck the first box. In most cases, you might want to allow shared drive managers to change the access settings for a shared drive so that they aren’t prevented from collaborating with external users or other teams.
-
Click Save. If you configured a child organizational unit, you might be able to Inherit or Override a parent organizational unit's settings.
Changes can take up to 24 hours but typically happen more quickly.
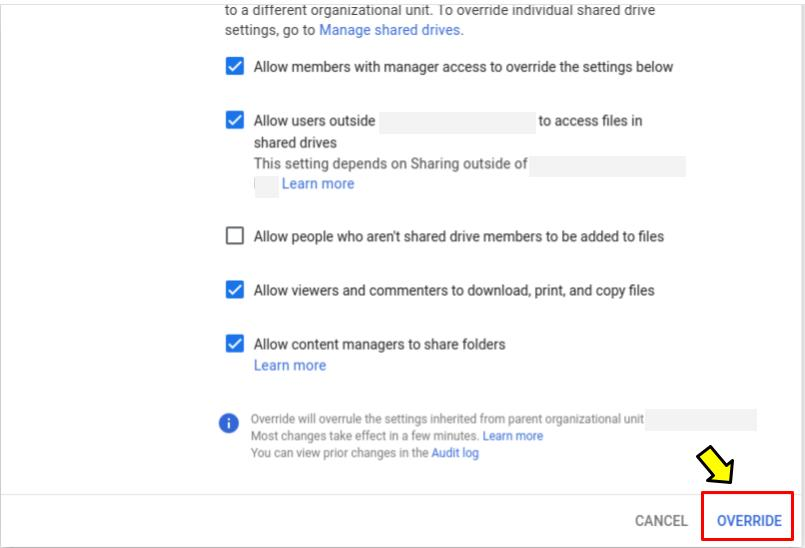
Change sharing settings for a shared drive
Before you begin:
-
If you make sharing settings more restrictive, some users may lose access. If you make sharing settings less restrictive, some users may gain access. Make sure you review the contents of the shared drive to understand what should and shouldn’t be shared.
-
Shared drive-sharing settings are overridden by Drive sharing settings if the Drive settings are more restrictive. For more information about sharing settings and shared drives, see Manage data policies for specific shared drives.
To update sharing settings for a shared drive:
-
In the Admin console, go to Menu > Apps > Google Workspace > Drive and Docs.
-
Click Manage shared drives.
-
Point to the shared drive you want to update and click Settings. If you have many shared drives, you can filter the list by shared drive name or other attributes.
-
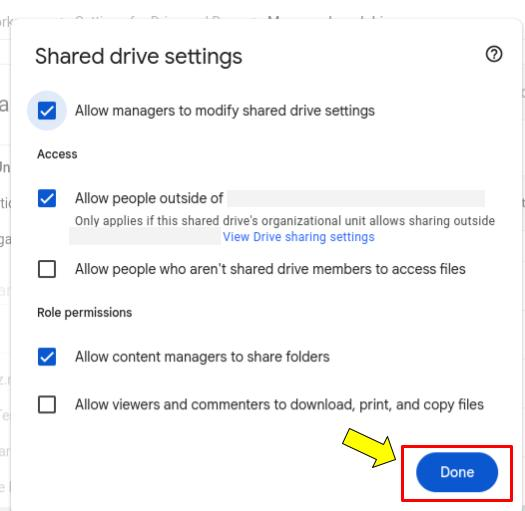
Update the sharing settings. Your changes are automatically saved as you update.
-
(Optional) To prevent shared drive managers from overriding your new settings, uncheck the first box.
-
Click Done.
Changes can take up to 24 hours but typically happen more quickly.
Restrict who can move content to external shared drives
You can control who can move files and folders outside of your organization when moving content from:
-
A shared drive in your organization to:
-
A shared drive owned by another organization
-
Someone’s My Drive in another organization
-
Someone’s My Drive in your organization to a shared drive owned by another organization
-
-
In the Admin console, go to Menu > Apps > Google Workspace > Drive and Docs.
-
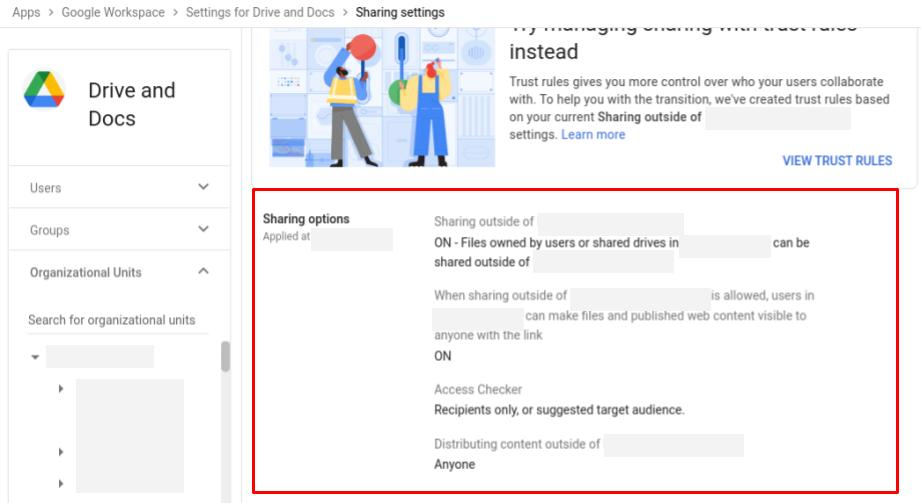
Click Sharing settings > Sharing options.
-
Select the desired organizational unit or group.
-
In Distributing content outside of your organization, select an option:
- Anyone
- People with Manager access to a shared drive can move files from that shared drive to a Drive location in a different organization. Learn more
- People in the selected organizational unit or group can move content from their My Drive to a shared drive owned by a different organization (for example, another business, group, or school). Learn more
- Anyone
-
- Only users in your organization
- People with Manager access to a shared drive can move files from that shared drive to a Drive location in a different organization.
- Users in the selected organizational unit or group can move content from their My Drive to a shared drive owned by a different organization.
- No one
- Files on a shared drive cannot be moved to a Drive location in a different organization.
- No one in the selected organizational unit or group can move content from My Drive to a shared drive owned by a different organization.
- No one in the selected organizational unit or group can create files on a shared drive owned by another organization.
- Only users in your organization
-
Click Save. If you configured a child organizational unit, you might be able to Inherit or Override a parent organizational unit's settings.
Important: If you select a child organizational unit or group, this setting only controls moving content from someone’s My Drive to a shared drive in a different organization (for example, another business or school). If the top-level organizational unit permits the user to share files outside their organization, but the child organizational unit does not, the user can’t share files outside their organization.
It can take up to 24 hours to see changes. During this time, old and new settings might be intermittently enforced.
Review user activity in shared drives
To review when files, settings, or members of shared drives changed and who made the changes, you can use the Drive audit log.
Review and appeal disabled shared drives
If Google detects that a shared drive contains content that violates the Terms of Service, it may disable the shared drive. Your content isn’t deleted, but users can't access it until the shared drive is reinstated by Google upon your appeal.
If you believe that the shared drive was disabled in error, you can submit a request for a review. You have 29 days to appeal. If you don’t appeal, the disabled shared drive is automatically deleted.
-
In the Admin console, go to Menu > Apps > Google Workspace > Drive and Docs.
-
Click Manage shared drives.
-
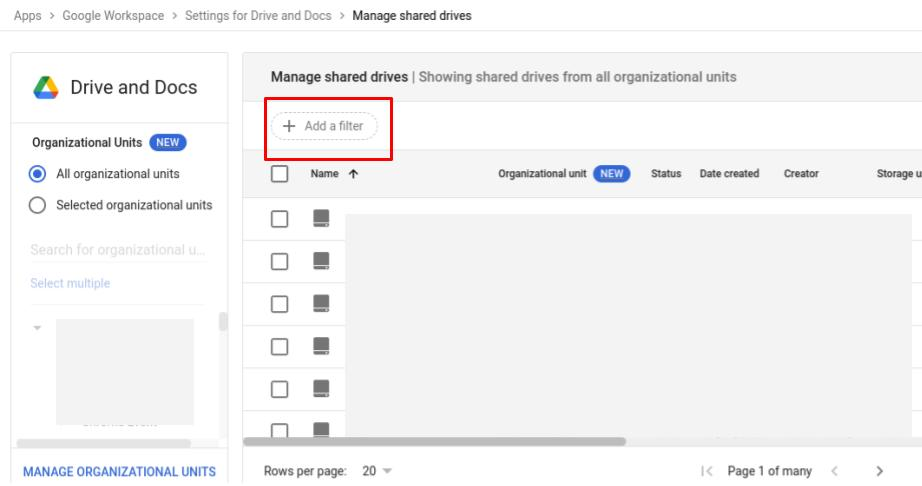
Click Add a Filter.
-
Then click Status > Disabled and then click Apply.
-
Point to the disabled shared drive you want to appeal and click More > Request review.
Your appeal for the shared drive is reviewed. If approved, the shared drive is reinstated.
Move your organization's content to shared drives
As an administrator, you can move folders into shared drives, provided you have view access for the folder and you are a manager of the shared drive. You can also control who can move files from My Drive to shared drives in Google Drive and assign a limited admin role to users who need it.
Move folders into shared drives as an admin
Users who have Manager access to a shared drive can move a folder from My Drive to the shared drive. They’re limited in which files they can move, though, so sometimes it might make more sense for an admin to move the folder instead.
The following steps describe how to add yourself as a manager of the shared drive, get access to the folder to move, and then move the folder. Only accounts with the required Google Workspace admin role can move folders into shared drives. If you don’t have the correct admin role, ask a Google Workspace admin to give you permission.
Note: File access might change when you move a folder:
-
All members of the shared drive can view the contents of the folder, including previously hidden files. (Hidden files occur in My Drive when you share a folder with someone but remove access to a specific file in that folder).
-
Users who had a folder directly shared with them before the move can still access the folder. Users with Editor access to the folder before the move have Content Manager access after.
-
Users who had indirect access to a folder and its contents through access to a parent folder may lose access to the folder. Indirect file permissions inherited from parent folder permissions aren’t copied.
To move a folder to a shared drive:
-
If you don't already have Manager access to the shared drive:
-
In the Admin console, go to Menu > Apps > Google Workspace >Drive and Docs.
-
Click Manage shared drives.
-
Point to the shared drive you want to move folders to and click Manage Members. If you have many shared drives, you can filter the list by shared drive name or other attributes.
-
Add your admin account to the shared drive with Manager permissions.
-
-
If you don't already have access to the folders you want to move to a shared drive, ask the owner to give your admin account Viewer access or more.
-
Open drive.google.com with your admin account.
-
At the left, click Shared with me, and locate the folder you want to move.
-
At the left, expand Shared drives and locate the shared drive you want to move the folder to.
-
Drag the folder you want to move to the shared drive.
-
Accept the confirmation request to move the folder to the shared drive. You might get warnings or error messages about the following issues:
-
The folder has unmovable items, such as items owned by another organization. You can download a CSV list of the unmovable items that includes the item name, owner, and reason it can’t be moved. For details, on this page see Unmovable files and folders.
-
You try to move more than 100,000 items at once. If the parent folder is too big, you can create a new parent folder in the shared drive and then move subfolders individually to stay under the limit.
-
The move will result in more than 400,000 items in the shared drive or more than 20 nested folders. For details, see Shared drive limits.
-
You can’t move folders to shared drives owned by external organizations.
-
Unmovable files and folders
For any files or folders that can’t be moved due to permission or access issues, a shortcut to the item is created in the shared drive to preserve the existing folder structure, and the item is moved to the root of the file owner’s My Drive. To avoid major reorganization of folder structure or contents due to unmovable items, a folder move is rejected in the following scenarios:
-
25 or more items are unmovable
-
10% or more of the items are unmovable
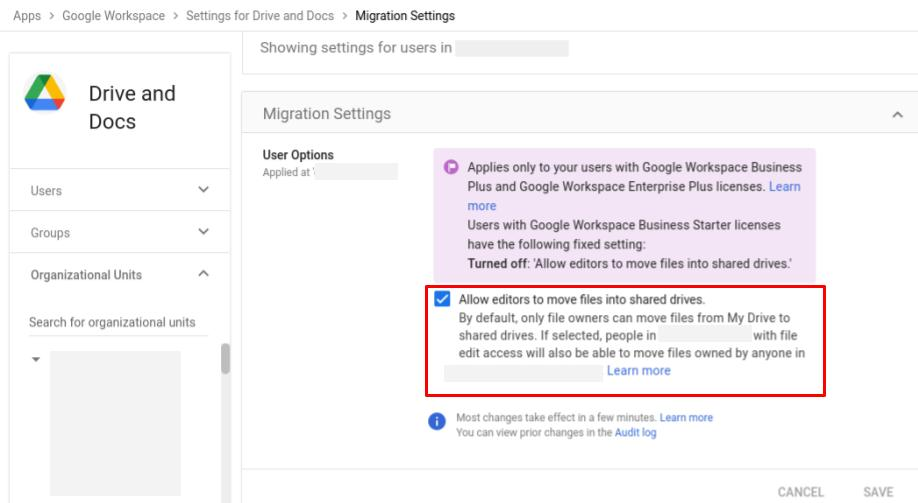
Allow file owners or editors to move files into shared drives
This setting controls who can move a file into a shared drive, either owners and editors or only the owner of a file. Because file ownership changes from the owner to the organization when a file is moved to a shared drive, this option controls who can change the ownership of a file.
-
When Allow users to migrate files to shared drives is checked:
-
The owner of a file can move it to a shared drive location to which they have Contributor, Content manager, or Manager access.
-
Editors can move a file to a shared drive location to which they have Contributor, Content manager, or Manager access, (provided the owner is either suspended or a member of the shared drive).
-
-
When Allow users to migrate files to shared drives is unchecked, only the owner of the file can move it to a shared drive to which they have the required access levels.
Before you begin: To apply the setting for certain users, put their accounts in an organizational unit (to set by department) or a configuration group (to set for users across or within departments).
-
In the Admin console, go to Menu > Apps > Google Workspace > Drive and Docs.
-
Click Migration settings.
-
To apply the setting to everyone, leave the top organizational unit selected. Otherwise, select a child organizational unit or a configuration group.
-
Check the Allow users to migrate files to shared drives box.
-
Click Save. If you configured an organizational unit or group, you might be able to either Inherit or Override a parent organizational unit, or Unset a group.

Allow a user to move most files and folders to shared drives
If a user needs to move files and folders that they don’t own or have edit access to, and you’re OK delegating admin access to them, you can assign a limited admin role to them.
-
Create an admin role with the Drive and Docs Move any file or folder into shared drives privilege.
Manage data policies for specific shared drives
As an administrator, you control your organization’s policies on files in Google Drive, including files in shared drives. By default, shared drives are assigned to the top organizational unit, and the policies you set on that organizational unit apply to all shared drives. However, you can also assign shared drives to child organizational units so that the policies applied to those organizational units apply to the shared drives assigned to them. You can also set the default organizational unit that shared drives are created in.
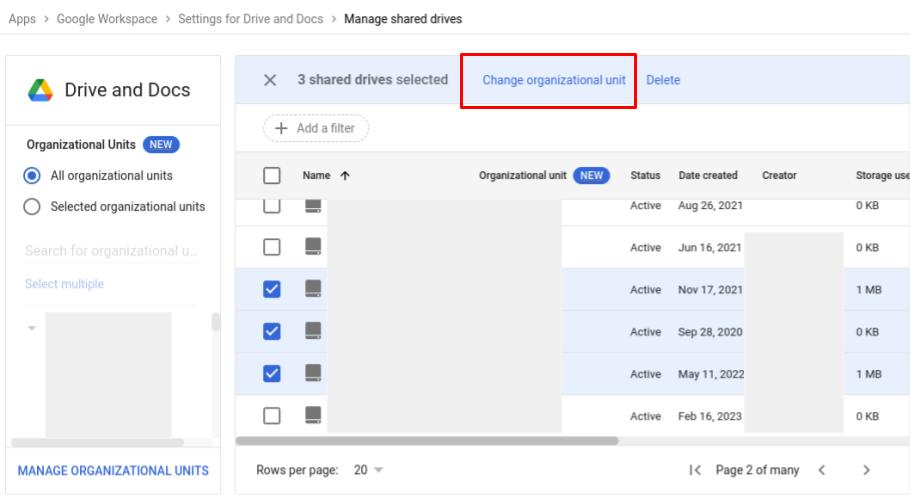
Assign a shared drive to an organizational unit
-
In the Admin console, go to Menu > Apps > Google Workspace > Drive and Docs.
-
Click Manage shared drives.
-
Find one or more shared drives you want to move.
-
To sort by the amount of storage used, click the Storage Used column header.
-
To filter the list, click Add a filter. You can filter by Shared drive name, Status, Date created, No members, and No managers.
-
To find shared drives in specific organizational units, at the left click Selected organizational units. Specify which organizational units' shared drives you want to see.
-
-
To move a single shared drive, point to the row, and click More > Change organizational unit. To move several shared drives at once, check the box next to each shared drive, then at the top click Change organizational unit.
-
Select the organizational unit you want to move the shared drives to, then click Continue.
-
Click Move.
Set the default organizational unit for new shared drives
-
In the Admin console, go to Menu > Apps > Google Workspace > Drive and Docs.
-
Click Sharing settings.
-
To apply the setting to everyone, leave the top organizational unit selected. Otherwise, select a child organizational unit.
-
Click Shared Drive creation.
-
Under Organizational unit for new shared drives, select which organizational unit to assign new shared drives to.
-
Click Save. If you configured a child organizational unit, you might be able to Inherit or Override a parent organizational unit's settings.
Delete or restore a shared drive and its files for your users
As an administrator, you can delete and restore shared drives in your Google Workspace Admin console. You might delete shared drives if you need to free up storage and know that a shared drive is no longer used, or if a shared drive has content that violates your organization’s data policy. You might restore a shared drive or its content if a user accidentally deleted it.
Delete a shared drive
To delete a shared drive without emptying it or having access to it, you can use your Admin console.
-
In the Admin console, go to Menu > Apps > Google Workspace > Drive and Docs.
-
Click Manage shared drives.
-
Find the shared drives you want to delete. If you have many shared drives, you can filter the list by shared drive name or other attributes.
-
To delete a single shared drive:
-
Point to the shared drive and click More > Delete.
-
Check the confirmation box and then click Delete Shared Drive.
-

-
To delete many shared drives:
-
Check the box next to each shared drive you want to delete.
-
At the top, click Delete.
-
Check the confirmation box and then click Delete Shared Drives.
-
Deleted shared drives remain visible in the list of shared drives in your Admin console for 30 days after you delete them. They're listed with a status of Deleted.
Restore a deleted shared drive or files deleted from the shared drive
If a shared drive was deleted and needs to be restored, you can restore it using the Admin console if it was deleted within the last 25 days. You can also use the Admin console to restore files that were deleted from a shared drive.
Before you begin: If you restore many files or folders at once, it might take some time to restore all the items. If you start a restore while another one is in progress, one of them is canceled.
-
In the Admin console, go to Menu > Apps > Google Workspace > Drive and Docs.
-
Click Manage shared drives.
-
(Optional) Click Add a Filter to select a filter option, such as No members or Date created.
-
Point to a shared drive, click more and click the Restore button.
-
Select a date range for the data restore. If you're restoring a shared drive and want to restore all the files that were in the shared drive when it was deleted, you must select the date it was deleted up to the current date.
Important:
-
If the user who deleted the shared drive and the admin restoring it are in different time zones, it's possible that data might not be restored. This may be because there is a time zone difference, even though the day is the same. To make sure this doesn’t happen, either include a time buffer or consider the time zone difference when selecting the date range.
-
You can only restore items that were removed from the shared drive's trash within the last 25 days, even if you have Google Vault retention policies in place. For details, go to Retain files in Drive with Vault.
-
-
Click Restore Data.
Please check the below-supporting article for your further reference:
Set up shared drives for your organization - Google Workspace Admin Help