How retention works
Data retention rules control how your organization saves and deletes Google Workspace data for compliance or regulatory reasons.
By default, Google Workspace data stays in user accounts until the user or admin deletes it. If your organization needs more control over data retention, you can set up retention rules in Google Vault. These rules organize how data is stored, for how long, and purge data once it’s no longer needed.
- Keep data for as long as you need it ->You can set up rules in Vault to retain data for how long you need it. The data is kept even if users delete messages and files or empty their trash.
- Remove data when you no longer need it ->You can schedule Vault to delete data after a duration of time. When the retention period expires, the data is automatically removed from user accounts and purged from all Google systems. (Data under a legal hold is not purged.) The time it takes to removed expired data varies depending on the service. Learn more about how data can remain in Vault
Two types of retention rules:
Default retention rules
Set a default retention rule when you must keep all data for a service for a set time. Default rules apply to data only when a custom rule or hold doesn’t apply. You can’t apply default retention rules to only specific accounts or time periods, and you can only have one default retention rule for each service.
Custom retention rules
Set custom retention rules to keep specific data for a set time. You can specify the data with conditions and terms depending on the service:
- Gmail and Groups->Set by organizational unit, date ranges, and specific search terms.
- Drive, Meet, and Sites->Set by organizational unit and define expiration based on last modified dates (to address staleness) and created dates (to address compliance requirements), or trashed dates.
- Chat->Set by organizational unit or for all Chat spaces in the organization.
- Google Voice-> for Google Workspace–Set by organizational unit and data type.
You can set as many custom rules as your organization needs. Data is retained according to the rule with the latest expiration. For Drive, if a Drive item in the trash is subject to multiple retention rules, a moved-to-trash rule supersedes all other retention rules.
Retain Gmail messages with Vault
As part of your organization's information governance plan, you can control how long Gmail messages are retained. Use retention rules to set how long to keep messages and when to delete them, if ever.
To keep data that matches specific conditions for a set time, create a custom retention rule. To keep all service data for all licensed accounts for a set time, create a default retention rule.
WARNING: An improperly configured retention rule can allow Gmail to immediately and irreversibly purge messages. Use caution when you create or change retention rules. We recommend that you test new rules on a small set of accounts before you apply the rules to your entire organization.
Key Gmail retention behavior:
- When a message is included in a hold, Gmail can’t purge the message even after all applicable retention periods end.
- Custom Gmail retention rules always supersede the default Gmail retention rule.
- When multiple custom retention rules apply to a message, Gmail keeps the message as required by the rule with the retention period that ends last.
- Gmail's 30-day preservation policy can delay when messages are purged.
What data can be retained?
Covered:
- Messages and their attachments sent, received, or drafted by users in your organization
- Confidential mode messages sent by users in your organization
Not covered:
- Linked files
- Messages sent through other Google services, such as Calendar or Google Docs, unless comprehensive message storage is turned on
- Dynamic content in dynamic messages
- Discarded drafts and auto-saved versions of drafts
For details, see Supported services and data types.
Steps to set a custom retention rule for Gmail:
- Sign in to vault.google.com.
- Click Retention > Custom Rules > Create.

-png-1.png)
4. Choose which organizational unit the rule applies to. Click the field to open a chooser, then click the organizational unit.
5. Click Continue.
-png.png)
6. (Optional) Choose the conditions that must be met for messages to be covered by this rule:
- Enter Date sent values. If you specify only a start date, the rule applies to all messages sent after that date. If you specify only an end date, the rule applies to all messages sent before that date.
- Enter any terms that messages must match. Note:
- You can use all supported search operators except wildcards (*).
- If your keyphrase or value starts with a hyphen, such as -1000%, put it in quotation marks to ensure it’s not interpreted as a NOT operator.
- You can't use is:chat to apply a Gmail retention rule to chat messages in Google Chat. To set retention rules for chat messages, set a Chat retention rule.
- We recommend you test your terms in a Vault search to make sure they match data as you expect.

7. Click Continue.
8. Choose how long to keep messages:
- To permanently retain messages covered by this rule, choose Indefinitely.
- To discard messages after a set time, choose the Retention period and enter the number of days, from 1 to 36,500.
-png.png?width=539&height=196&name=image%20(3)-png.png)
- To purge only messages that are already emptied from the users' Trash, choose the first option.
- To purge all messages, including messages that aren't deleted but excluding drafts and email templates, choose the second option.
- To purge all messages, including messages that aren't deleted, drafts, and email templates, choose the third option.

10. Click Create. If you set a retention period, Vault asks you to confirm you understand the rule's effects. Check the boxes and click Accept to create the rule.
-png.png?width=497&height=340&name=image%20(4)-png.png)
Steps to set the default retention rule for Gmail
The default retention rule applies to Gmail messages that aren't covered by a custom rule or a hold.
- Sign in to vault.google.com.
- Click Retention. The list of default rules opens.
- Click Gmail
-png-1.png?width=455&height=310&name=image%20(4)-png-1.png)
- To permanently retain messages covered by this rule, select Indefinitely.
- To discard messages after a set time, select the Retention period and enter the number of days, from 1 to 36,500.
- To purge only messages that are already deleted, choose the first option.
- To purge all messages, including messages that aren't deleted, drafts, and templates, choose the second option.
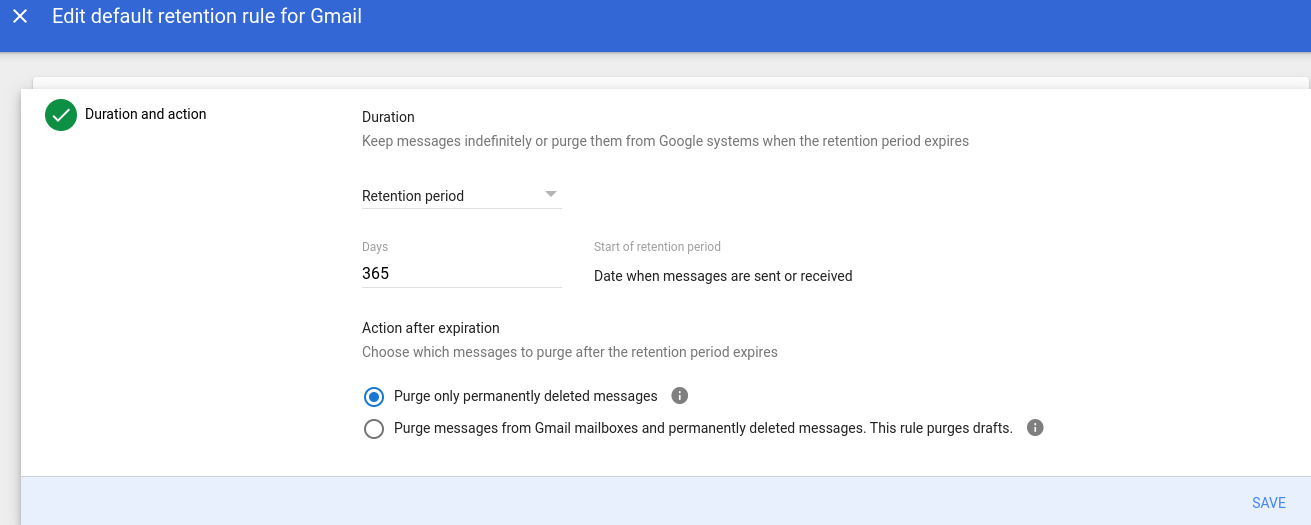
6. Click Save. Vault asks you to confirm you understand the rule's effects. Check the boxes and click Accept to save the rule.
Retain files in Drive with Vault:
As part of your organization's information governance plan, you can control how long files in Drive are retained. Use retention rules to set how long to keep files and when to delete them, if ever. By default, Drive rules apply to Meet data but not to sites. To change which data Drive rules cover, you can set and turn on Meet-specific rules and change Sites retention settings.
To keep data that matches specific conditions for a set time, create a custom retention rule. To keep all service data for all licensed accounts for a set time, create a default retention rule.
What data can be retained?
Covered:
- Files in users’ Drives and shared drives
- Files encrypted with Google Workspace Client-side encryption
- Meet data, unless Meet-specific retention is turned on
Not covered:
- Folders and Drive shortcuts
- Sites, unless Sites-specific retention is turned off
- Linked files
- External files shared with your users
- Sites created in classic Sites
For details, see Supported services and data types (sections for Drive, Meet, and Sites).
Steps to set a custom retention rule for Drive
- Sign in to vault.google.com.
- Click Retention > Custom Rules > Create.
- For the service, select Drive and then click Continue.

- Organizational unit->Apply the rule to a specific organizational unit:
- Click the field and choose an organizational unit.
- (Optional) To apply the rule to shared drives that accounts in the selected organizational unit are members of, enable Include results from shared drives.
- All shared drives->Apply the rule to all shared drives in your organization.
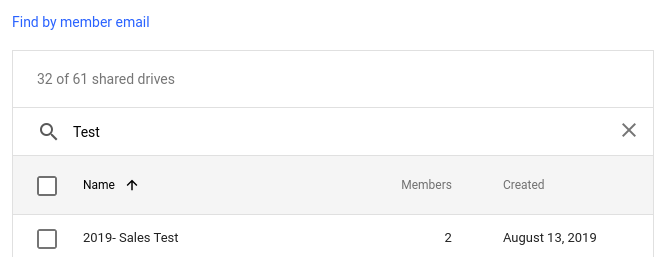
- Specific shared drives->Apply the rule to one or more shared drives.
Select the shared drives and click Add. If you have many shared drives and the list is paginated, your selection is preserved as you change pages. If you check the select all box at the top of the list, it selects only the current page. You can also search the list by a member’s email or by the shared drive’s name.

--> Click Find by member email.
-->Enter one or more accounts.
-->Click Find.
-png.png?width=382&height=245&name=image%20(5)-png.png)
b. To filter the list by the name of the shared drive (available if your organization has fewer than 1,000 shared drives):
-
- Click the Filter by name box.
- Enter letters in the name of the shared drive. For example, pr matches shared drives named “Sales projects”, “Marketing Projects”, and “Product management”, but not “Repairs”.
The paginated list automatically updates as you add letters.
c. To find the shared drive by name (available if your organization has more than 1,000 shared drives):- Click Find by name.
- Enter one or more words in the name of the shared drive. Note: Words must be exact and complete. For example, marketing, projects matches shared drives named “Marketing projects Q4’22” and “Projects for marketing”. It doesn’t match a shared drive named “Marketing project archive” because “project” doesn’t end with an “s”. Similarly, ma doesn’t match any of these shared drives because it’s only part of a word, not the complete word.
- Click Find.
5. Click Continue.
6. Choose how long to keep files:
-
- To permanently retain files covered by this rule, select Indefinitely.
- To discard files after a set time:
- Select Retention period.
- Enter the number of days, from 1 to 36,500.
- Select the reference time for the start of the retention period.
7. If you set a retention period, what to do with files when the retention period ends:
-->To purge only files that are already emptied from the users' Trash, choose the first option.
-->To purge all files, including files that aren't deleted, choose the second option.
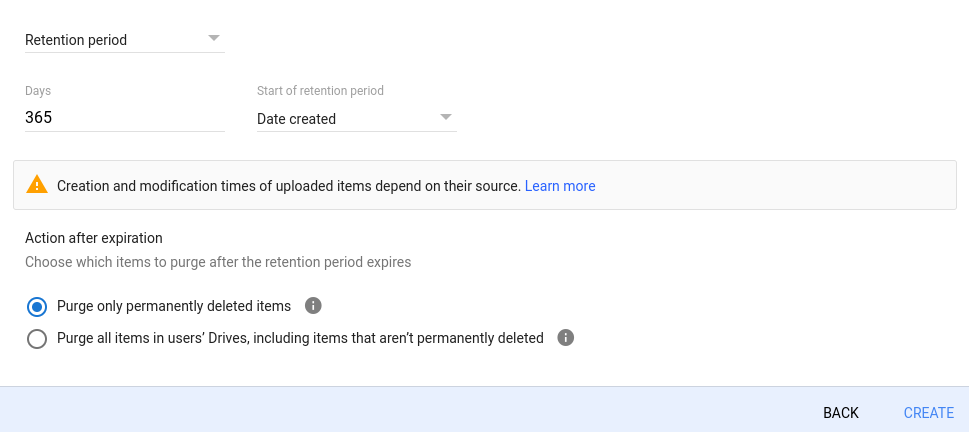
8. Click Create. If you set a retention period, Vault asks you to confirm you understand the rule's effects. Check the boxes and click Accept to create the rule.
Steps to set the default retention rule for Drive
The default retention rule applies to files in Drive, including files in shared drives, that aren't covered by a custom rule or a hold.
- Sign in to vault.google.com.
- Click Retention. The list of default rules opens.
- Click Drive.
- Choose how long to keep files:
-->To permanently retain files covered by this rule, select Indefinitely.
-->To discard files after a set time:- Select Retention period.
- Enter the number of days, from 1 to 36,500.
- Select the reference time for the start of the retention period.
- To purge only files that are already emptied from the users' Trash, choose the first option.
- To purge all files, including files that aren't deleted, choose the second option.

6. Click Save. Vault asks you to confirm you understand the rule's effects. Check the boxes and click Accept to save the rule.
Retain messages in Groups with Vault:
As part of your organization's information governance plan, you can control how long messages in Groups are retained. Use retention rules to set how long to keep messages and when to delete them, if ever.
To keep data that matches specific conditions for a set time, create a custom retention rule. To keep all service data for all licensed accounts for a set time, create a default retention rule.
What data can be retained?
Covered:
- Messages and their attachments in groups sent when conversation history is turned on
Not covered:
- Messages in groups sent when conversation history is turned off
- Messages waiting for approval in moderated groups
- Linked files
- Messages in deleted groups
For details, see Supported services and data types.
Steps to set a custom retention rule for Groups:
- Sign in to vault.google.com.
- Click Retention > Custom Rules > Create.
- For the service, select Groups and then click Continue.

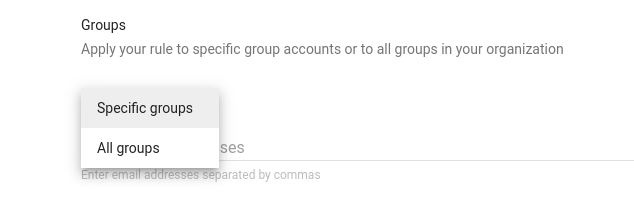
- Specific groups->Enter the email addresses of one or more groups.
- All Groups->Apply the rule to all groups in your organization.
5. Click Continue.
6. (Optional) Choose the conditions that must be met for messages to be covered by this rule:
- Enter Date sent values. If you specify only a start date, the rule applies to all messages sent after that date. If you specify only an end date, the rule applies to all messages sent before that date.
- Enter any terms that messages must match. You can use all supported search operators except wildcards (*).
- To permanently retain messages covered by this rule, choose Indefinitely.
- To discard messages after a set time, choose Retention period and enter the number of days, from 1 to 36,500.
- To purge only messages that are already deleted, choose the first option.
- To purge all messages, including messages that aren't deleted, choose the second option.
Steps to set the default retention rule for Groups:
The default retention rule applies to messages in Groups that aren't covered by a custom rule or a hold.
- Sign in to vault.google.com.
- Click Retention. The list of default rules opens.
- Click Groups.
- Choose how long to keep messages:
- To permanently retain messages covered by this rule, select Indefinitely.
- To discard messages after a set time, select Retention period and enter the number of days, from 1 to 36,500.
- To purge only messages that are already deleted, choose the first option.
- To purge all messages, including messages that aren't deleted, choose the second option.
Retain messages in Google Chat with Vault
As part of your organization's information governance approach, you can control how long direct messages (DMs), group messages, and messages in spaces in Google Chat are retained. Use retention rules to set how long to keep messages and when to delete them, if ever.
To keep data that matches specific conditions for a set time, create a custom retention rule. To keep all service data for all licensed accounts for a set time, create a default retention rule.
What data can be retained?
Covered:
- Messages and their attachments sent with history on, in Chat
- DMs sent by external users to your users
- Messages sent by external users in your organization’s group messages and spaces
Not covered:
- Messages sent with history off
- Linked files
- Messages in external Chat spaces
- Previewed messages
For details, see Supported services and data types.
Steps to set a custom retention rule for Chat
- Sign in to vault.google.com.
- Click Retention > Custom Rules > Create.
- For the service, select Chat and then click Continue.

- To retain DMs and group conversations that were sent or received by accounts in an organizational unit, select Organizational unit. Click the organizational unit field and, in the dialog that opens, click the organizational unit. The rule doesn't apply to messages in spaces or group conversations in Chat created after early December 2020.
- To retain messages in all spaces in your organization, select All Chat spaces. The rule doesn't apply to direct messages or some group messages.
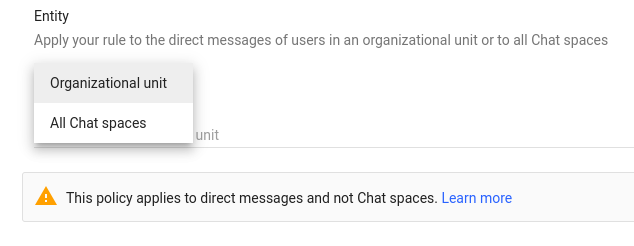
Review the differences between rule types.
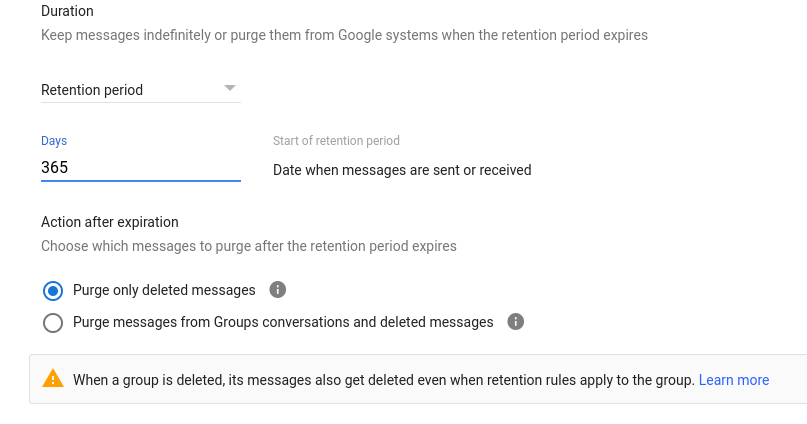
5. Choose how long to keep messages:- To permanently retain messages covered by this rule, choose Indefinitely.
- To discard messages after a set time, choose Retention period and enter the number of days, from 1 to 36,500.
6. Click Create. If you set a retention period, Vault asks you to confirm you understand the rule's effects. Check the boxes and click Accept to create the rule.
Steps to set the default retention rule for Chat:
- Sign in to vault.google.com.
- Click Retention. The list of default rules opens.
- Click Chat .
- Choose how long to keep messages:
- To permanently retain messages covered by this rule, choose Indefinitely.
- To discard all messages after a set time, choose Retention period and enter the number of days, from 1 to 36,500.
5. Click Save. Vault asks you to confirm you understand the rule's effects. Check the boxes and click Accept to save the rule.
Retain Google Meet recordings and logs with Vault:
As part of your organization's information governance plan, you can control how long Google Meet recordings and logs are retained. Use retention rules to set how long to keep Meet data and when to delete them, if ever. By default, Meet data is subject to retention rules for Drive because the files are stored in Drive. To manage the retention of Meet data separately from other Drive items, you can set Meet-specific retention rules. These rules don't take effect until you enable Meet retention rules in Vault's retention settings.
To keep data that matches specific conditions for a set time, create a custom retention rule. To keep all service data for all licensed accounts for a set time, create a default retention rule.
Steps to set a custom retention rule for Meet:
- Sign in to vault.google.com.
- Click Retention > Custom Rules > Create.
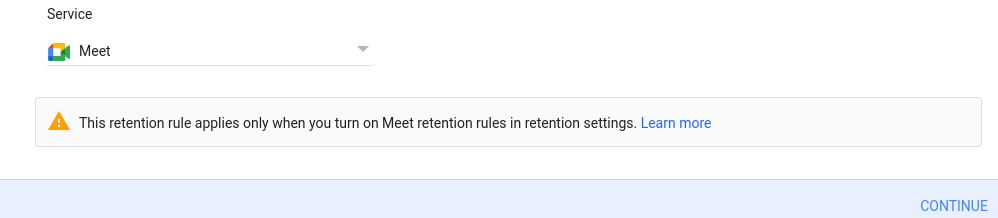
- For the service, select Meet and then click Continue.
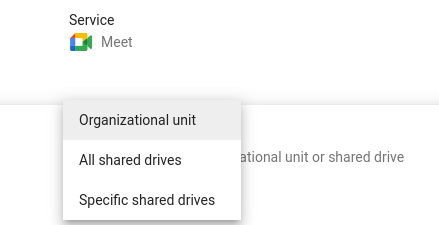
4. Choose an entity:
Organizational unit->Apply the rule to a specific organizational unit:
--> Click the field and choose an organizational unit.
--> (Optional) To apply the rule to shared drives that accounts in the selected organizational unit are members of, enable Include results from shared drives.
All shared drives->Apply the rule to all shared drives in your organization.
Specific shared drives->Apply the rule to a shared drive shared with a specific account.
-
- Click Add shared drives.
- Enter one or more accounts and click Find.
- Select one or more shared drives.
- Click Add.

5. Click Continue.
6. Choose how long to keep files:
-->To permanently retain files covered by this rule, select Indefinitely.
-->To discard files after a set time:
-> Select Retention period.
->Enter the number of days, from 1 to 36,500.
->Select the reference time for the start of the retention period.
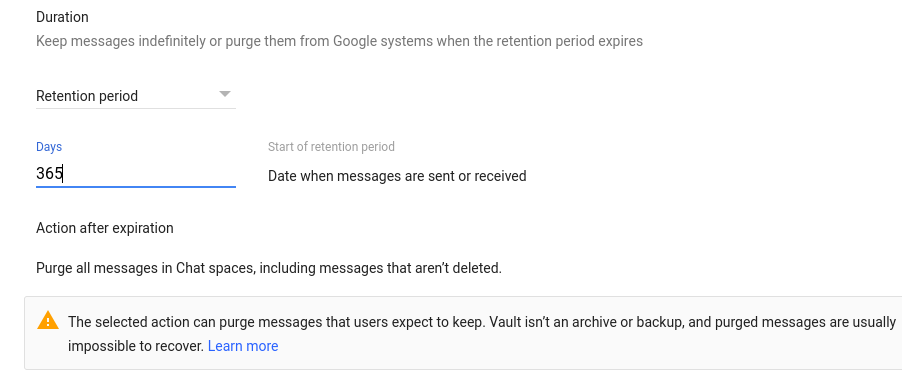
7. If you set a duration, choose what to do with the data after the retention period ends:
-->To purge only the data that users deleted, choose the first option.
-->To purge all data, choose the second option. This rule can purge both deleted data and data in users' Drives.
Warning: If you enabled dedicated Meet rules, Vault immediately allows Meet to purge data that exceeds the retention duration when you create a rule. These files might include data users expect to keep. Do not proceed to the next step until you’re sure the rule is configured correctly.

Steps to set the default retention rule for Meet:
When turned on, the default Meet retention rule applies to all Meet data that isn't covered by a custom rule or a hold, including recordings in My Drive and in shared drives.
- Sign in to vault.google.com.
- Click Retention. The list of default retention rules opens.
- Click Meet .
- Choose how long to keep files:
- To permanently retain files covered by this rule, select Indefinitely.
- To discard files after a set time:
-
-
- Select Retention period
- Enter the number of days, from 1 to 36,500.
-
-
-
- Select the reference time for the start of the retention period.
-
5. If you set a duration, choose what to do with data after the rention period ends:
- To purge only the data that users deleted, choose the first option.
- To purge all data, choose the second option. This rule can purge both deleted data and data in users' Drives.
Warning: If you enabled dedicated Meet rules, Vault immediately allows Meet to purge data that exceeds the retention duration when you save the rule. These data might include files users expect to keep. Do not proceed to the next step until you’re sure the rule is configured correctly.
6. Click Save. Vault asks you to confirm you understand the rule's effects. Check the boxes and click Accept to save the rule.
(Optional) Enable dedicated retention rules for Meet:
Meet recordings are retained by Drive retention rules until you change Vault settings and enable Meet retention rules.
To apply Meet retention rules to Meet recordings and associated logs instead of Drive retention rules:
- Sign in to vault.google.com.
- Click Retention > Settings.
- Next to Meet, select Retained by Meet rule.
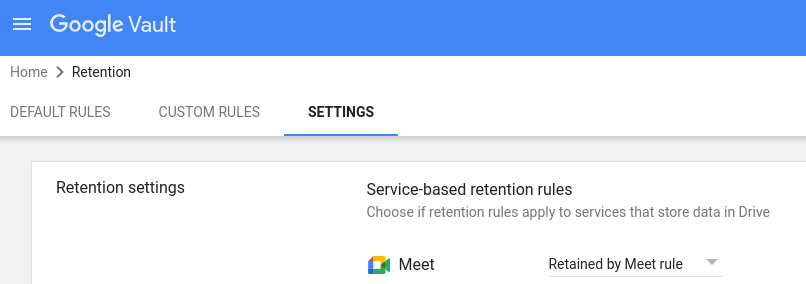
4. Click Save.
Retain Google Sites data with Vault:
As part of your organization's information governance plan, you can control how long Google Sites data is retained. Use retention rules to set how long to keep sites and when to delete them, if ever. By default, sites are retained according to Sites-specific retention rules. To retain sites the same as other files in Drive, you can turn off Sites rules. Then sites are retained according to retention rules for Drive because they're stored in Drive.
To keep data that matches specific conditions for a set time, create a custom retention rule. To keep all service data for all licensed accounts for a set time, create a default retention rule.
Sites-specific retention is turned on until you switch to Drive retention
Sites-specific retention is turned on by default. When you have no rules set up and Sites-specific retention is turned on, users and admins can delete sites or keep them as long as they want.
To manage sites retention separate from Drive, set custom or default retention rules for Sites.
To manage sites the same as other files in Drive, change the retention setting to retain sites by Drive rules.
Steps to set a custom retention rule for Sites:
- Sign in to vault.google.com.
- Click Retention > Custom Rules > Create.
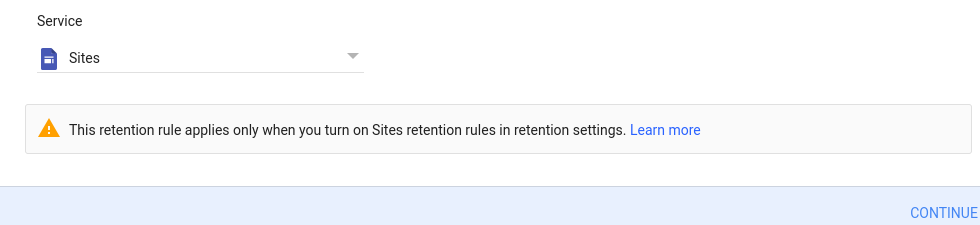
- For the service, select Sites and then click Continue.
-
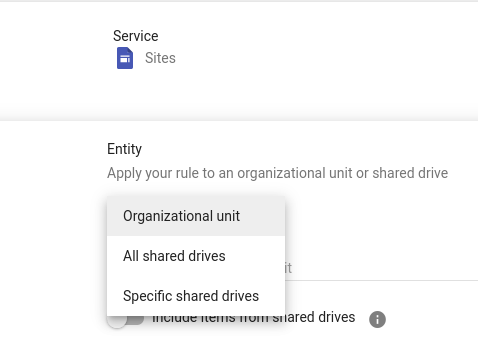
- Organizational unit->Apply the rule to a specific organizational unit:
- Click the field and choose an organizational unit.
- (Optional) To apply the rule to shared drives that accounts in the selected organizational unit are members of, enable Include results from shared drives.
- All shared drives->Apply the rule to all shared drives in your organization.
- Specific shared drives->Apply the rule to a shared drive shared with a specific account.
- Click Add shared drives.
- Enter one or more accounts and click Find.
- Select one or more shared drives.
- Click Add.
- Organizational unit->Apply the rule to a specific organizational unit:
5. Click Continue.
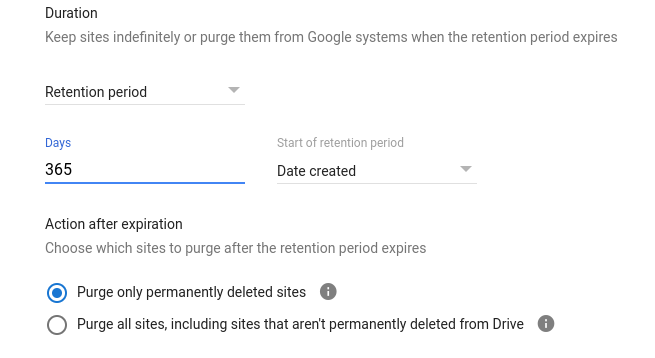
6. Choose how long to keep files:
-
- To permanently retain files covered by this rule, select Indefinitely.
- To discard files after a set time:
- Select Retention period.
- Enter the number of days, from 1 to 36,500.
- Select the reference time for the start of the retention period.
7. If you set a duration, choose what to do with sites after the retention period ends:
- To purge only sites that users permanently deleted, choose the first option.
- To purge all sites, choose the second option. This rule can purge both deleted sites and sites still in users' Drives.
Warning: Sites-specific retention is turned on by default. When you create a Sites rule, Vault immediately allows Sites to purge data that exceeds the retention duration. This data might include sites users expect to keep. Do not proceed to the next step until you’re sure the rule is configured correctly.
8. Click Create. If you set a retention period, Vault asks you to confirm you understand the rule's effects. Check the boxes and click Accept to create the rule.
Steps to set the default retention rule for Sites:
When turned on, the default Sites retention rule applies to all sites that aren't covered by a custom rule or a hold, including sites in My Drive and in shared drives.
- Sign in to vault.google.com.
- Click Retention. The list of default retention rules opens.
- Click Sites .
- Choose how long to keep files:
- To permanently retain files covered by this rule, select Indefinitely.
- To discard files after a set time:
-
-
- Select Retention period.
- Enter the number of days, from 1 to 36,500.
- Select the reference time for the start of the retention period.
-
5. If you set a duration, choose what to do with sites after the retention period ends:
- To purge only sites that users deleted, choose the first option.
- To purge all sites, choose the second option. This rule can purge both deleted sites and sites in users' Drives.
Warning: Sites-specific retention is turned on by default. When you create a Sites rule, Vault immediately allows Sites to purge data that exceeds the retention duration. This data might include sites users expect to keep. Do not proceed to the next step until you’re sure the rule is configured correctly.
6. Click Save. Vault asks you to confirm you understand the rule's effects. Check the boxes and click Accept to save the rule.
Steps to turn dedicated retention rules for Sites on or off:
Sites data is retained by Sites retention rules until you change Vault settings retain sites by Drive retention rules.
To choose which rules apply to sites, do the following steps:
- Sign in to vault.google.com.
- Click Retention > Settings.
- Next to Sites, select Retained by Sites rule or Retained by Drive rule.

4. Click Save.
Manage retention rules and holds:
As a Vault user, you should check your retention rules and holds periodically. Ensure that Vault is helping you meet your organization's business and legal requirements.
Manage default retention rules:
Default retention rules provide global preservation and purge policies for each service. They apply to user data when custom retention rules or holds don't apply.
- Sign in to vault.google.com.
- Click Retention.
- On the Default Rules tab, review the default rules. Verify that they're set the way you want.
- If the duration and action value is No default retention, then no default retention rule is set for that service.
- If the status is Off, then the data for that service is covered by another service's default retention rule, if any. A default rule that's off might have a duration that's "Not set" or a number of days. These default retention rules apply only when retention for that setting is turned on.
- To edit a default retention rule, click Edit and make your changes. Then click Save.
- To unset a default retention rule, point to the rule and click Delete. Click Delete again to confirm.
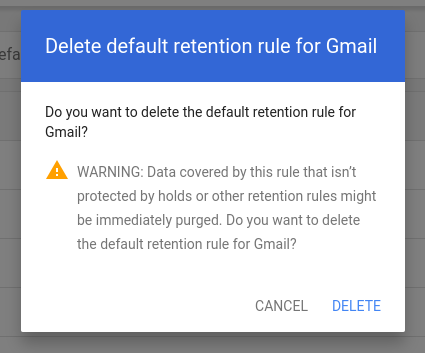
Note: If you shorten the retention duration or unset a default rule, you might allow the service to purge data you want to keep. Proceed with caution.
Manage custom retention rules:
Custom retention rules control how long specific types of data are retained.
Verify or edit a custom rule
- Sign in to vault.google.com.
- Click Retention > Custom Rules.
- Review the custom rules. You can filter the list to a specific service, condition, and other rule properties.
- To edit a custom rule, click the rule and make your changes.
Note: Your updates are applied as soon as you save them. You risk losing data that users expect to keep. Proceed with caution.
5. Click Save.
Delete a custom retention rule
- Sign in to vault.google.com.
- Click Retention > Custom Rules.
- To delete a single rule, point to the rule and click Delete.
- To delete many rules:
- Check the box next to each rule you want to delete.
- At the top, click Delete.

5. Confirm that you want to delete the rule and click Delete.
Manage holds
Holds are placed on specific users, organizational units, groups, Chat spaces, or shared drives. Holds retain data indefinitely and take precedence over default retention rules and any custom retention rules. For details, see Get started with holds in Google Vault.
Steps to edit a hold
- Sign in to vault.google.com.
- Click Matters and click the matter with the hold you want to edit. If you don't know which matter has the hold, you can find the hold through Reports:
- On the Vault home page, click Reports.
- To find holds on an organizational unit, click Domain Holds.
- To find holds on a user, click User Holds.
- To find holds on groups, click Group Holds.
- Click the hold you want to edit.
- Click Edit hold. Make your changes.
Note: When you edit a hold, the data might be immediately purged if no retention rules or other holds apply. Proceed with caution.
-png-1.png)
5. Click Save.
Steps to delete a hold
- Sign in to vault.google.com.
- Click Matters and click the matter with the hold you want to edit. If you don't know which matter has the hold, you can find the hold through Reports:
- On the Vault home page, click Reports.
- To find holds on an organizational unit, click Domain Holds.
- To find holds on a user, click User Holds.
- To find holds on groups, click Group Holds.
- Check the box next to the hold you want to delete.
- At the top, click Delete.
Note: When you delete a hold, the data might be immediately purged if no retention rules or other holds apply. Proceed with caution.
5. Confirm that you want to delete the hold and click Delete.
Review which users are on hold
- Sign in to vault.google.com.
- Click Reports.
- Click User Holds. Any users who are on hold appear in the list.
- Click the hold to see what matter the hold belongs to.
-png-1.png?width=369&height=247&name=image%20(7)-png-1.png)
Please check the below-supporting article for your further reference: