Set up SSO for your organization
You can set up SSO with Google as your service provider in a number of ways, depending on your organization’s needs. SSO profiles, which contain the settings for your IdP, give you the flexibility to apply different SSO settings to other users in your organization.
Google Workspace supports both SAML-based and OIDC-based SSO protocols:
If all your users will sign in through one IdP, using SAML
- Follow the steps below in configuring an SSO profile for your organization.
- If you want to exclude some users from using SSO (and have them sign in directly to Google), follow the steps in Decide which users should use SSO, where you have the option to assign 'None' for the SSO profile.
- If you use multiple IdPs for your users or use OIDC.
The steps you follow depend on the protocol used by your IdP (SAML):
SAML
Follow the steps below in Create SSO profiles for each of your IdPs.
Decide which users should use SSO.
Before you begin
To set up a SAML SSO profile, you’ll need some basic configuration from your IdP’s support team or documentation:
Sign-in page URL This is also known as the SSO URL or SAML 2.0 Endpoint (HTTP). This is where users sign in to your IdP.
Sign-out page URL (Optional) Where the user lands after exiting the Google app or service.
Certificate X.509 PEM certificate from your IdP. For more information on X.509 certificates, see the SAML key and verification certificate.
Change password URL (Optional) The page where SSO users will go to change their password (instead of changing their password with Google).
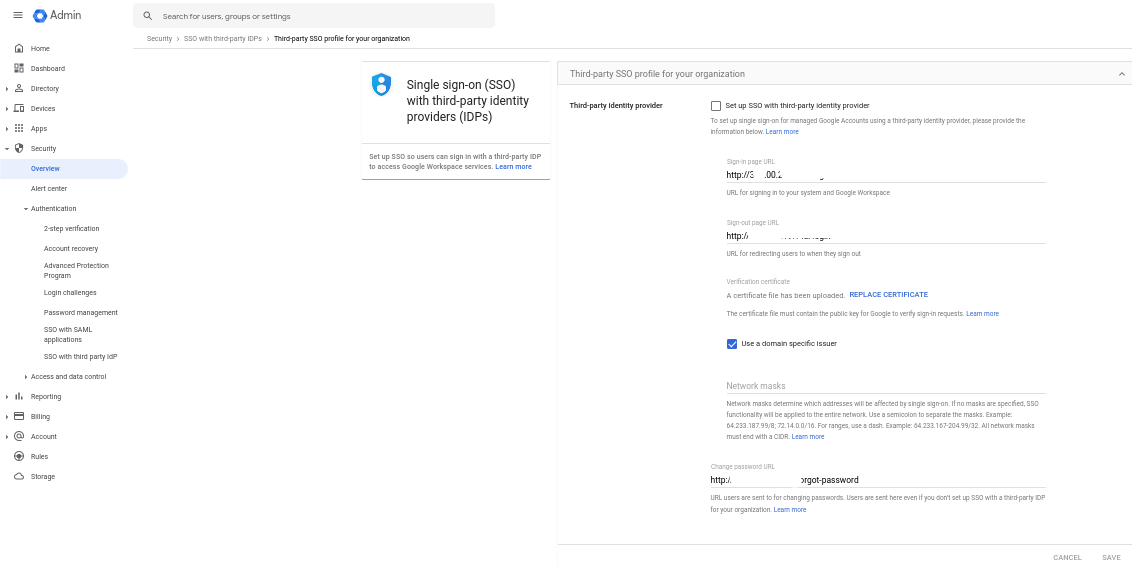
Configure the SSO profile for your organization
- Use this option if all your users using SSO will use one IdP. In the Admin console, go to Menu > Security > Overview.
- In the Third-party SSO profile for your organization, click Add SSO profile.
Fill in the following information for your IdP:
Enter the Sign-in page URL and Sign-out page URL for your IdP.
Note: All URLs must be entered and must use HTTPS, for example, https://sso.domain.com.
Click Upload certificate and locate and upload the X.509 certificate supplied by your IdP. For information on generating a certificate, see the SAML key and verification certificate.
Choose whether to use a domain-specific issuer in the SAML request from Google.
If you have multiple domains using SSO with your IdP, use a domain-specific issuer to identify the correct domain issuing the SAML request.
Checked Google sends an issuer-specific to your domain: google.com/a/your_domain.com (where your_domain.com is your primary Google Workspace domain name)
Unchecked Google sends the standard issuer in the SAML request: google.com
(Optional) To apply SSO to a set of users within specific IP address ranges, enter a network mask. For more information see Network mapping results.
Note: you can also set up partial SSO by assigning the SSO profile to specific organizational units or groups.
(Optional) Enter a change password URL for your IdP. Users will go to this URL (rather than the Google Change password page) to reset their passwords.
Note: If you enter a URL here, users are directed to this page even if you don’t enable SSO for your organization.
Turn off SSO for all users
If you need to turn third-party authentication off for all your users without changing the SSO profile assignment for OUs or groups, you can disable the third-party SSO profile:
- Uncheck Set up SSO with the third-party identity provider.
- Click Save.
Create an SSO profile
1. In the Admin console, go the Menu > Security > Overview.
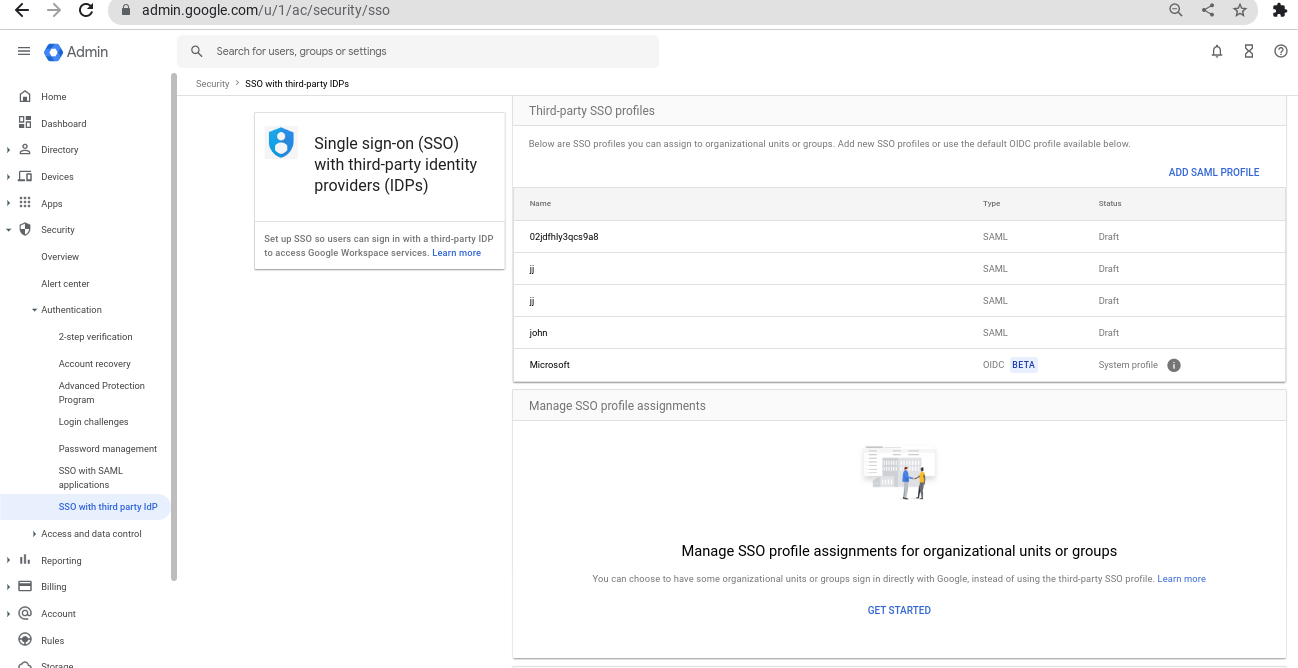
In the Admin console, go the Menu > Security > Overview.Under Third-party SSO profiles, click Add SAML profile.
Enter a name for the profile.
Fill in the Sign-in page URL and other information obtained from your IdP.
(Optional) Enter a change password URL for your IdP. Users will go to this URL (rather than the Google Change password page) to reset their passwords.
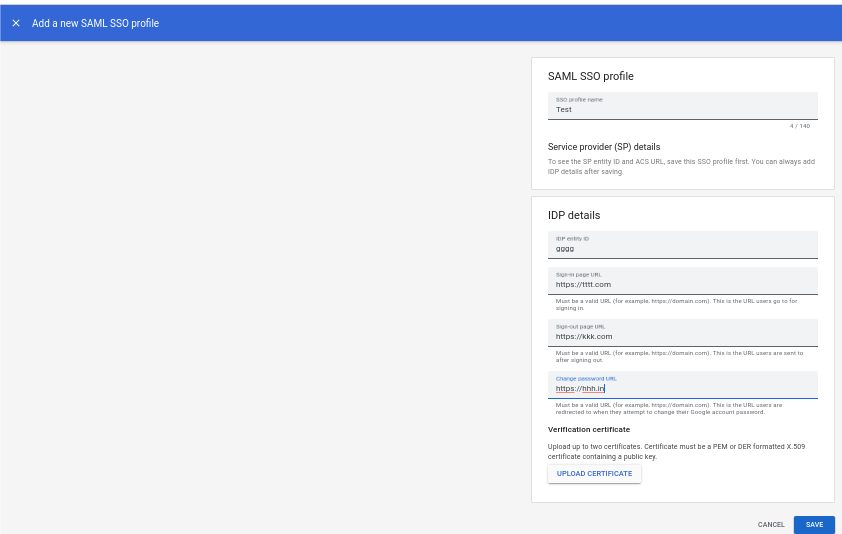
1. Click Upload certificate, then locate and upload your certificate file. For information on generating a certificate, see the SAML key and verification certificate.
2. Click Save.
3. In the SP Details section, Copy and save the Entity ID and ACS URL.You'll need these values to configure SSO with Google in your idp admin control panel.
Note: You can Create a maximum of 1000 third-party SSO Profiles.
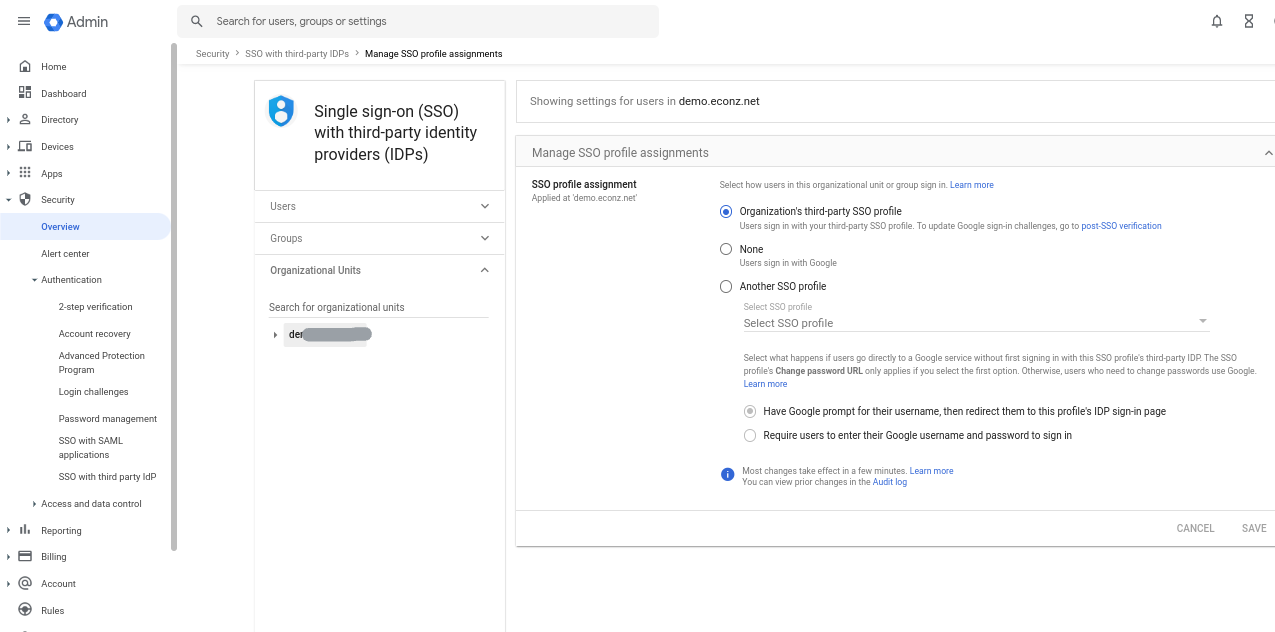
Decide which users should use SSO
Turn SSO on for an OU or group by assigning an SSO profile and its associated IdP. Or, turn SSO off by assigning ‘None’ for the SSO profile. You can also apply a mixed SSO policy within an OU or group, for example turning SSO on for the OU as a whole, then turning it off for a sub-OU.
- Click Manage SSO profile assignments.
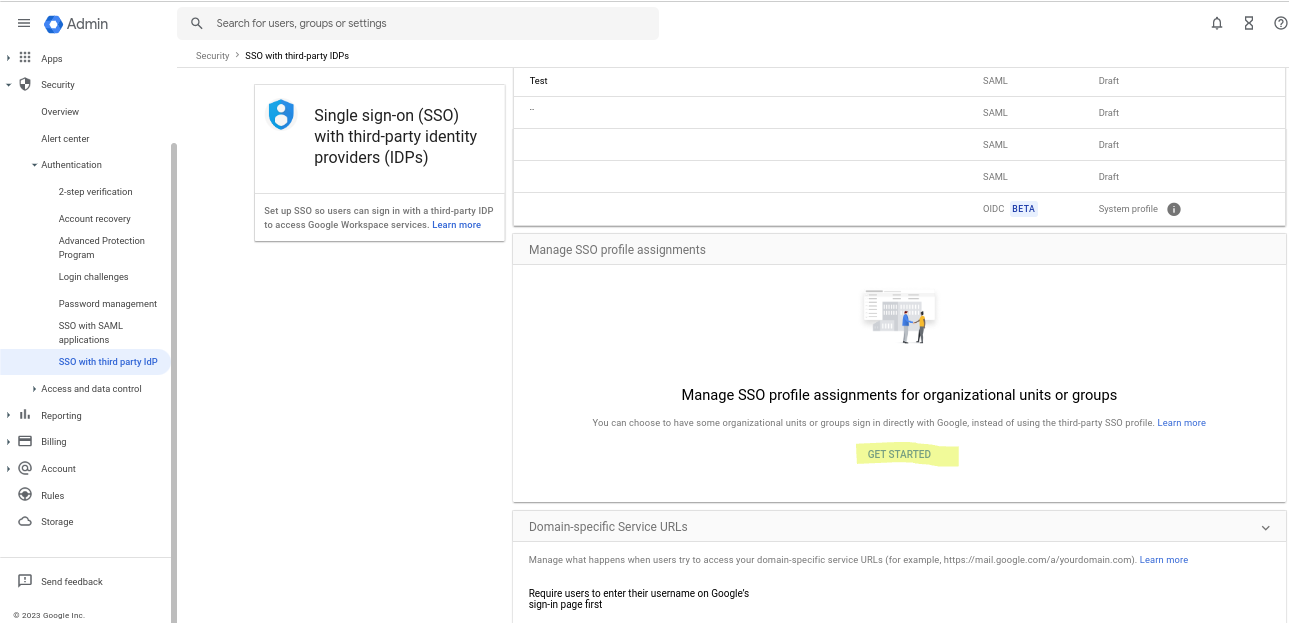
- If this is your first time assigning the SSO profile, click Get Started. Otherwise, click Manage.
- On the left, select the organizational unit or group to which you’re assigning the SSO profile.
- If the SSO profile assignment for an OU or group differs from your domain-wide profile assignment, an override warning appears when you select that OU or group.
- You can’t assign the SSO profile on a per-user basis. The Users view let you check the setting for a specific user.
- Choose an SSO profile assignment for the selected OU or group:
- To exclude the OU or group from SSO, choose None. Users in the OU or group will sign in directly with Google.
- To assign another IdP to the OU or group, choose Another SSO profile, then select the SSO profile from the dropdown list.
- (SAML SSO profiles only) After selecting a SAML profile, choose a sign-in option for users who go directly to a Google service without first signing into the SSO profile's third-party IdP. You can prompt users for their Google username, then redirect them to the IdP, or require users to enter their Google username and password.
Note: If you choose to require users to enter their Google username and password, the Change password URL setting for this SAML SSO profile (available at SSO Profile > IDP details) is ignored. This ensures that users are able to change their Google passwords as needed. - (Microsoft OIDC SSO profile only) Enter your Microsoft account password and click Sign in to verify your Microsoft SSO configuration.
If you're an Azure AD organization admin, you have the option to accept consent on behalf of the organization. This means that end-users will not be prompted to provide OAuth consent.

- Click Save.
- Assign SSO profiles to other OUs or groups as needed.
After you close the Manage SSO profile assignments card, you’ll see the updated assignments for OUs and groups in the Manage SSO profile assignments section.
Please find the support article to get further details on the same.