What is LDAP?
The Secure LDAP service provides a simple and secure way to connect your LDAP-based applications and services to Cloud Identity or Google Workspace. Using Secure LDAP, you can use Cloud Directory as a cloud-based LDAP server for authentication, authorization, and directory lookups.
The LDAP-based apps (for example, Atlassian Jira) and IT infrastructure (for example, VPN servers) that you connect to the Secure LDAP service can be on-premise or in infrastructure-as-a-service platforms such as Google Compute Engine, AWS, or Azure.
You can use Secure LDAP to reduce the traditional directory server footprint—where your applications are pointed to several directory servers—by pointing your apps only to Secure LDAP.
How to configure Google LDAP?
- Go to https://admin.google.com/Dashboard and sign in as a Google Workspace domain administrator.
- Go to Apps > LDAP > Add Client.
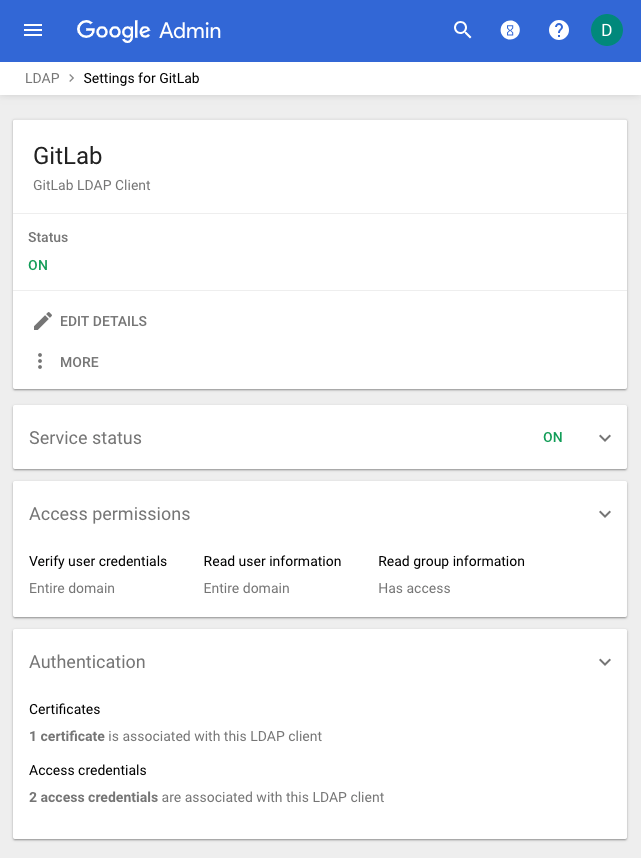
- Provide an LDAP client name and an optional Description. Any descriptive values are acceptable. For example, the name could be Gitlab and the description could be GitLab LDAP Client. Select Continue.
- Set Access Permission according to your needs. You must choose either Entire domain (GitLab) or Selected organizational units for both Verify user credentials and Read user information. Select Add LDAP Client.
If you plan to use GitLab LDAP Group Sync , turn on Read group information. - Download the generated certificate. This is required for GitLab to communicate with the Google Secure LDAP service. Save the downloaded certificates for later use. After downloading, select Continue to Client Details.
- Expand the Service Status section and turn the LDAP client On for everyone. After selecting Save, select the Service Status bar again to collapse and return to the rest of the settings.
- Expand the Authentication section and choose Generate New Credentials. Copy/note these credentials for later use. After selecting Close, select the Authentication bar again to collapse and return to the rest of the settings.


Now the Google Secure LDAP Client configuration is finished. The screenshot below shows an example of the final settings. Continue on to configure GitLab.
Please find the below article for your reference:- https://support.google.com/a/answer/9048516?hl=en