Email attachments can include malicious software that might be missed by traditional antivirus programs. To identify these threats, Gmail can scan or run attachments in a virtual environment called Security Sandbox. Attachments identified as threats are sent to the recipient's Spam folder.
You can create rules that specify which attachments are scanned in Security Sandbox. For example, you might create rules like these, to scan attachments that:
Include specific content, for example, the word invoice
Come from specified users
Are sent from outside a specified domain
Have envelope addresses that match specific patterns
Security Sandbox can scan attachments from both inside your domain and from external domains.
How Security Sandbox scans work with other scans
Security Sandbox scans run independently of other compliance and pre-delivery scans. For example, your content compliance scans might search for personal information such as credit card numbers. Attachment compliance scans might block attachments of a specific type or size. Gmail runs compliance and pre-delivery scans separately from Security Sandbox scans.
Note: Security Sandbox doesn't scan email attachments blocked by compliance rules or pre-delivery scans.
Security Sandbox scans can delay the message delivery by up to 3 minutes. Some scans might be completed in less time.
Find Security Sandbox settings
- From the Google workspace Admin console, go to Apps
- This will open up Google Workspace, then Select Gmail
- This will open the Gmail settings from that select Spam, Phishing and Malware.
- Here you can scroll down to security sandbox settings and configure the Rules accordingly.

Below are the different rule types which we can create based on our requirements:
1) Scan all attachments in Security Sandbox- To scan all attachments, check the Enable virtual execution of attachments in a sandbox environment... box.
- At the bottom of the page, click Save.
2) Set up rules to specify which attachments are scanned in Security Sandbox.

- In the Spam, Phishing and Malware section, under Security Sandbox, clear the Enable virtual execution of attachments in a sandbox... box. When this box is cleared, attachments are scanned in the sandbox only if they match sandbox rule

- Point to Security sandbox rules at the bottom of the Spam, Phishing and Malware section, then click Configure.

- In the Add setting box, under Security sandbox rules, enter a name for the rule.
- In the Email messages to affect section, check the boxes next to message types:
- Inbound—Messages sent to your organization from external domains.
- Internal - receiving—Messages sent and received within your organization's domains and subdomains.

- In the Add expressions that describe the content you want to search for in each message section:
a)Select whether you want to match any or all expressions.

b)In the Expressions box, click Add.
c)From the list, choose what you want to specify for the expression, then click Save.

-
- Simple content match—Match the content you specify.
- Advanced content match—Select the Location of the text within the message and the Match type, and enter the content to search. Unlike simple content match, the string must be an exact match.
- Metadata match—Select the attribute to match and the Match type. If needed, enter the Match value.
- Predefined content match—Select one of the predefined content detectors
Note: For more information on different options for advanced content match and Metadata match refer to link
- Verify that Run security sandbox appears as the action when expressions match.

From here the Options are optional you can use it to specify your rules settings further,please choose only the options releveant to your requirement.
- For more options, click Show options.
- In the Options section, check the Use address lists to bypass or control application of this setting box.
- Select an option:
- Bypass this setting for specific addresses / domains—Skips the rule if the address list matches, regardless of any other criteria specified in the rule.
- Only apply this setting for specific addresses / domains—The address list match becomes a condition for whether the rule applies. If there are other criteria in the rule (match expressions, account types, or envelope filters), those conditions must also match for the rule to apply.
Here we are using specific addresses/ domains,and then creating a new list and using it ,if you already have a list you can simply select it from the existing list .

-
- Create an address list by selecting create or edit list, and add the desired Email addresses and Domains to the Address List


-
- Come back to the routing and select Use existing list and select the Address list that you created earlier.
- Select your settings for Account types to affect:
- Users
- Unrecognized/Catch-all
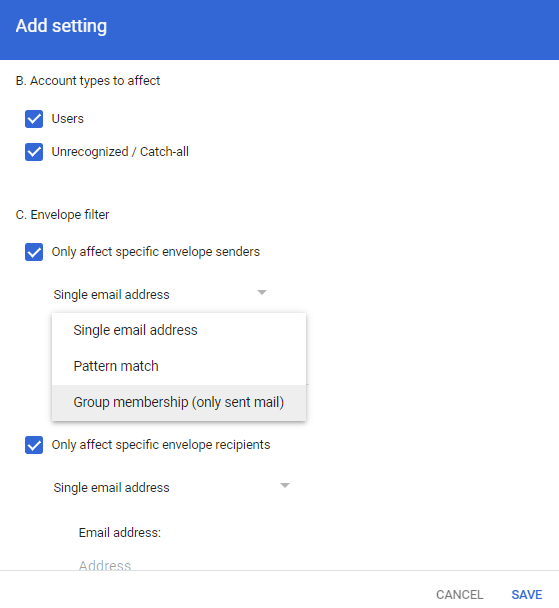
- Select your settings for Envelope filter: Check the Only affect specific envelope senders box, the Only affect specific envelope recipients box, or both and choose the options accordingly.
- Click Save.
Changes can take up to 24 hours but typically happen more quickly.
For more information please refer to the link