As an administrator, you can create settings to quarantine messages sent to and from your organization. You can also assign admin privileges to specific users to let them manage quarantined messages.
Quarantines help prevent spam, minimize data loss, and protect confidential information. Quarantines also help manage message attachments, so users don’t open or send something they shouldn’t. When a message is quarantined, it's sent to the admin quarantine, where an admin can take any of the following actions:
- Display the rule that caused the message to be quarantined
- Deliver the message to the intended recipient
- Deny message delivery
- Take no action
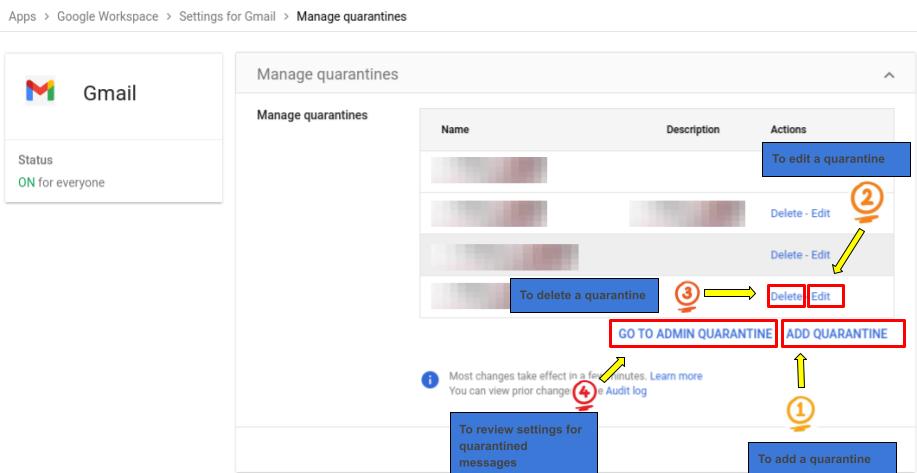
Add, edit, delete, and review quarantines
In your Admin console, you can add, edit, delete, and review email quarantines.
- Sign in to the Admin console, and go to Apps > Google Workspace > Gmail > Manage quarantines.
To add a quarantine:
- Click Add Quarantine.
- Assign quarantine settings:
- Enter a name and description.
- For incoming and outgoing messages, choose whether or not to send a reject message to the sender when you deny delivery of a quarantined message.
- (Optional) Select Notify periodically when messages are quarantined.
- Click Save.
Note: You can set up a Quarantine reviewers group to enable other users in your organization to review quarantines. For details, see Let users manage email quarantines.
To edit a quarantine:
- Find the quarantine name > click Edit.
- Make the desired changes > Save.
To delete a quarantine:
- Find the quarantine name > click Delete > Confirm Deletion.
Any remaining messages in the quarantine are moved to the default quarantine.
Note: Quarantines in use by one or more policy settings can't be deleted. To delete an active quarantine, go to the relevant setting and point it to a different quarantine.
To review settings for quarantined messages:
- Click Go to Admin Quarantine.
- All quarantined messages are displayed, including messages in the default quarantine.
- If a message is in a customized quarantine, the quarantine name displays beside the email subject.
- Click a quarantine name. This opens a pop-up window showing the quarantine details.
- (Optional) To edit the quarantine settings from this page, click Edit in Admin Console.
Configure policies to quarantine messages
In the Admin console, you set up and configure policies to quarantine messages using any of these Gmail settings:
For each setting, you can quarantine messages that match the configuration criteria, then select the quarantine for the selected messages.
For compliance and routing settings, you can also choose to notify internal senders when their outbound and internal, sent messages are quarantined.
Manage quarantined messages
After setting up and configuring policies for a quarantine, you can view and manage messages in it.

Inbound and outbound messages
Messages appear with the quarantine name and the direction of inbound or outbound.
- If an inbound message includes multiple recipients, it appears in the quarantine once for each recipient. For example, a message with five recipients appears in quarantine five times.
- Outbound messages you allow to be delivered are quarantined only once before delivery. For this reason, if you plan to quarantine internal messages, configure the quarantine to Internal - Sending, instead of Internal - Receiving. Then, only one message is quarantined before it’s delivered to the recipients.
View and manage quarantined messages
|
Action |
How to do it |
|
View quarantined, pending triage, allowed, and denied messages |
By default, all quarantined messages appear in the list. You can filter messages by quarantine or status.
Only messages delivered within your Vault retention period appear in Denied or Allowed. If you don’t act on or deny a message, it's automatically deleted when your retention period expires. The default retention period is 30 days from the time the message was sent or received. |
|
Display message and rule definition that triggered quarantine |
Click the message in the list to display the message and the rule definition that caused the email to be routed to the quarantine.
Important: Source and matched string are displayed when available. Gmail makes its best effort to display the rule associated with a message, but some messages may not display a rule. |
|
Display message metadata |
Click the message > Show Original. Displays the textual representation of a Gmail message |
|
Search for messages |
Click Search in the filter bar, enter a search term in the badge, and click on "search contains..." This searches according to the current filter status. The entire message is searched, including the sender and recipient address, subject, and message body. You can use advanced search operators to search a particular part of the message. |
|
Allow delivery of one or more quarantined messages |
Check the box to the left of each recipient name > click Allow. If a user doesn’t see an allowed message in their inbox, ask them to search for the message in all folders, including the Trash folder. Note: Some spam messages might be rejected when Gmail makes a connection to transmit the message. These messages aren't sent to admin quarantine, even if you selected the Put spam in administrative quarantine option in your Spam setting. |
|
Deny delivery of one or more quarantined messages |
Check the box to the left of each recipient's name > click Deny. Click Deny again to confirm. Notes about rejection notices:
|
Send reject messages
If you choose to send a reject message when you deny a quarantined message, keep the following in mind:
- If you deny an inbound message sent to multiple recipients in your domain, the sender receives a reject message each time you select a group of recipients to deny.
To avoid this, you can check the boxes for all message recipients so that the sender receives a single reject message containing the entire list of rejected recipients. If you don’t select all recipients and later reject other recipients, the sender receives a second notification. - The body of a reject message includes the subject of the original message. For this reason, if the term that caused the original message to be quarantined appears in the subject, the reject message may also be quarantined when the message is denied. This depends on how you set up the quarantine (to include either Outbound or Internal - Sending messages).
- If you deny an inbound group message, the reject message is dropped and is not delivered to the sender.
Please check the below-supporting article for your further reference:
Set up and manage email quarantines - Google Workspace Admin Help